RabbitMQ
Key takeaways
| RabbitMQMessageQueue | Component used to send and receive messages via RabbitMQ. |
| OpenAsync() | Method used to connect to RabbitMQ. |
| SendAsync() | Method used to send messages to RabbitMQ. |
| ReceiveAsync() | Method used to receive messages from RabbitMQ. |
| queue, exchange, host, port (or uri) | Required configuration parameters. |
Introduction
In this tutorial, you will learn how to send and receive messages via RabbitMQ. First, we will see the necessary pre-requisites. Then, we will learn how to implement this component, connect to RabbitMQ and send and receive messages from it. Finally, we will combine the different sections into a program and summarize all the learned concepts.
The RabbitMQMessageQueue component
This component is part of the RabbitMQ module and represents a message queue that sends and receives messages via the RabbitMQ message broker. Furthermore, it is a subclass of MessageQueue. The following sections explain how to use it.
Pre-requisites
In order to use this component, we need to import it first. The following code shows how to do this:
import { RabbitMQMessageQueue } from 'pip-services3-rbbitmq-nodex'
using PipServices3.RabbitMQ.Queues;
import rqueues "github.com/pip-services3-gox/pip-services3-rabbitmq-gox/queues"
import 'package:pip_services3_rabbitmq/pip_services3_rabbitmq.dart';
Implementing our component
First, and after having imported our component, we create an instance of it:
let queue = new RabbitMQMessageQueue();
var queue = new RabbitMQMessageQueue();
queue := rqueues.NewEmptyRabbitMQMessageQueue("my_topic")
var queue = RabbitMQMessageQueue('my_test');
Configuring our component
After creating an instance of our component, we need to configure it. Here, an important point is to understand the different parameters involved in this operation. The following table summarizes them:
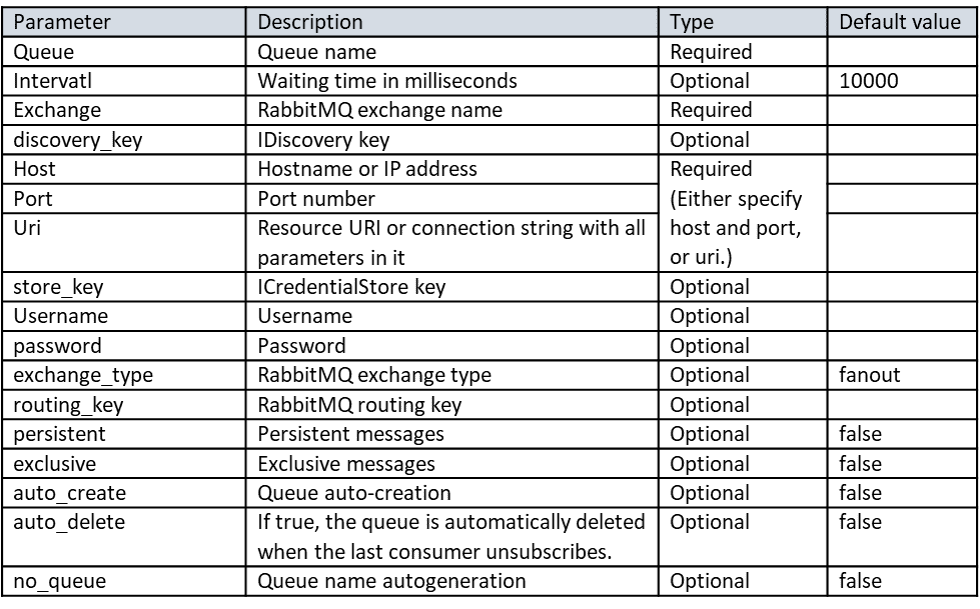
To configure our object, we use the configure() method, which accepts a ConfigParams object as input. In our example, we define the RabbitMQ exchange, the queue name, the host, and the port. We also assign the value true to auto_create. In this manner, if the queue doesn’t exist in RabbitMQ, it is created. Furthermore, for the example’s purpose, we consider the guest user. But, if we want to refer to another user, we also need to specify the necessary credentials (username and password).
import { ConfigParams } from 'pip-services3-commons-nodex';

queue.configure(ConfigParams.fromTuples(
    "exchange", "myqueue", // rabbitmq exchange type
    "queue", "myqueue", // queue name
    "options.auto_create", true, // autocreate queue
    "connection.host", "localhost",
    "connection.port", 5672
    // if need credentials
    //"credential.username", "user",
    //"credential.password", "pass123"
));
using PipServices3.Commons.Config;

queue.Configure(ConfigParams.FromTuples(
    "exchange", "myqueue", // rabbitmq exchange type
    "queue", "myqueue", // queue name
    "options.auto_create", true, // autocreate queue
    "connection.host", "localhost",
    "connection.port", 5672
    // if need credentials
    //"credential.username", "user",
    //"credential.password", "pass123"
));
import (
	"context"

	cconf "github.com/pip-services3-gox/pip-services3-commons-gox/config"
	rqueues "github.com/pip-services3-gox/pip-services3-rabbitmq-gox/queues"
)

queue.Configure(context.Background(), cconf.NewConfigParamsFromTuples(
	"exchange", "myqueue", // rabbitmq exchange type
	"queue", "myqueue", // queue name
	"options.auto_create", true, // autocreate queue
	"connection.host", "localhost",
	"connection.port", 5672,
	// if need credentials
	//"credential.username", "user",
	//"credential.password", "pass123"
))
import 'package:pip_services3_commons/pip_services3_commons.dart';

queue.configure(ConfigParams.fromTuples([
  'exchange',
  'myqueue', // rabbitmq exchange type
  'queue',
  'myqueue', // queue name
  'options.auto_create',
  true, // autocreate queue
  'connection.host',
  'localhost',
  'connection.port',
  5672
  // if need credentials
  //"credential.username", "user",
  //"credential.password", "pass123"
]));
Connecting to RabbitMQ
To connect to RabbitMQ, we use the Open() method, which requires the correlation_id as an input parameter. The following example shows how to connect our previously defined queue:
await queue.open("123");
await queue.OpenAsync("123");
err := queue.Open(context.Background(), "123")
if err != nil {
	panic(err)
}
await queue.open('123');
Creating and sending a message
Once connected, we can send a message to RabbitMQ. For this, we use the SendAsync() method, which accepts the correlation_id and a MessageEnvelope object as inputs. This last object contains the correlation_id, message type, and message content as inputs. The following code shows how to do this:
import { MessageEnvelope } from 'pip-services3-messaging-nodex';

await queue.send("123", new MessageEnvelope(null, "mymessage", "ABC"));
using PipServices3.Messaging.Queues;

await queue.SendAsync("123", new MessageEnvelope(null, "mymessage", "ABC"));
import cqueues "github.com/pip-services3-gox/pip-services3-messaging-gox/queues"

err = queue.Send(context.Background(), "123", cqueues.NewMessageEnvelope("123", "mymessage", []byte("ABC")))
import 'package:pip_services3_messaging/pip_services3_messaging.dart';

await queue.send('123', MessageEnvelope(null, 'mymessage', 'ABC'));
Receiving a message
To receive a message, we use the RecevieAsync() method, which has the correlation_id and the waiting time in milliseconds as input parameters. The following example shows how to use it:
let received = await queue.receive("123", 10000);
var received = await queue.ReceiveAsync("123", 0);
received, err := queue.Receive(context.Background(), "123", 0)
var received = await queue.receive('123', 0);
Final code
Now, we assemble all that was learned into one program. The result is:
import { ConfigParams } from 'pip-services3-commons-nodex';
import { MessageEnvelope } from 'pip-services3-messaging-nodex';
import { RabbitMQMessageQueue } from 'pip-services3-rbbitmq-nodex'

export async function main() {

    let queue = new RabbitMQMessageQueue();

    queue.configure(ConfigParams.fromTuples(
        "exchange", "myqueue", // rabbitmq exchange type
        "queue", "myqueue", // queue name
        "options.auto_create", true, // autocreate queue

        "connection.host", "localhost",
        "connection.port", 5672
        // if need credentials
        //"credential.username", "user",
        //"credential.password", "pass123"
    ));

    await queue.open("123");

    await queue.send("123", new MessageEnvelope(null, "mymessage", "ABC"));

    let received = await queue.receive("123", 10000);

    console.log(received.getMessageAsString());
    console.log("Task Completed");
}
using System;
using System.Threading.Tasks;

using PipServices3.Commons.Config;
using PipServices3.RabbitMQ.Queues;
using PipServices3.Messaging.Queues;


namespace ConsoleApp1
{
    internal class Program
    {
        static void Main(string[] args)
        {
            ExampleStart().Wait();
        }

        public static async Task ExampleStart()
        {
            var queue = new RabbitMQMessageQueue();

            queue.Configure(ConfigParams.FromTuples(
                "exchange", "myqueue", // rabbitmq exchange type
                "queue", "myqueue", // queue name
                "options.auto_create", true, // autocreate queue

                "connection.host", "localhost",
                "connection.port", 5672
                // if need credentials
                //"credential.username", "user",
                //"credential.password", "pass123"
            ));

            await queue.OpenAsync("123");

            await queue.SendAsync("123", new MessageEnvelope(null, "mymessage", "ABC"));

            var received = await queue.ReceiveAsync("123", 10000);

            Console.WriteLine(received.GetMessageAsString());
            Console.WriteLine("Task completed");
        }
    }
}
import (
	"context"
	"fmt"

	cconf "github.com/pip-services3-gox/pip-services3-commons-gox/config"
	cqueues "github.com/pip-services3-gox/pip-services3-messaging-gox/queues"
	rqueues "github.com/pip-services3-gox/pip-services3-rabbitmq-gox/queues"
)

func main() {
	// Create and configure a component
	queue := rqueues.NewEmptyRabbitMQMessageQueue("my_topic")

	queue.Configure(context.Background(), cconf.NewConfigParamsFromTuples(
		"exchange", "myqueue", // rabbitmq exchange type
		"queue", "myqueue", // queue name
		"options.auto_create", true, // autocreate queue
		"connection.host", "localhost",
		"connection.port", 5672,
		// if need credentials
		"credential.username", "user",
		"credential.password", "password",
	))

	err := queue.Open(context.Background(), "123")
	if err != nil {
		panic(err)
	}

	err = queue.Send(context.Background(), "123", cqueues.NewMessageEnvelope("123", "mymessage", []byte("ABC")))
	if err != nil {
		panic(err)
	}

	received, err := queue.Receive(context.Background(), "123", 10000)
	if err != nil {
		panic(err)
	}

	fmt.Println(received.GetMessageAsString())
	fmt.Println("Task completed")
}
import 'package:pip_services3_commons/pip_services3_commons.dart';
import 'package:pip_services3_messaging/pip_services3_messaging.dart';
import 'package:pip_services3_rabbitmq/pip_services3_rabbitmq.dart';

/// Running the container
void main(List<String> argument) async {
  var queue = RabbitMQMessageQueue('my_test');

  queue.configure(ConfigParams.fromTuples([
    'exchange',
    'myqueue', // rabbitmq exchange type
    'queue',
    'myqueue', // queue name
    'options.auto_create',
    true, // autocreate queue
    'connection.host',
    'localhost',
    'connection.port',
    5672,
    // if need credentials
    'credential.username', 'user',
    'credential.password', 'pass123'
  ]));

  await queue.open('123');

  await queue.send('123', MessageEnvelope(null, 'mymessage', 'ABC'));

  var received = await queue.receive('123', 10000); // receive is not supported in dart

  print(received.getMessageAsString());
  print('Task completed');
}
Which, after running, produces the following output that confirms the message was received and sent by RabbitMQ:

Wrapping up
In this tutorial, we have seen how to communicate with RabbitMQ by sending and receiving messages. First, we learned the basics of the RabbitMQMessageQueue component and how to import, implement and configure it. Then, we understood the different configuration parameters. Finally, we saw how to send and receive messages and created a program that combined all the learned concepts.